| Applying Zimmerit |
| Applying Zimmerit |
| HOME | ARTICLES | GALLERY | LINKS |
I cannot take credit for this great article. I downloaded it from a site that no longer exists. I thought it was terrific and a great aid to modelers in general that I had to include it. The models you see in my Armor sectio used this technique to replicate the zimmerit and it worked great. I used Milliput Fine Grain epoxy putty which was not available at the time this article was written and might be more available than the RJ product mentioned here and worked great. So with credit noted here is the article reprinted with the gracious permission of the author. By Paul A. Owen I do not think there is another word in model building that causes as much fear as "Zimmerit" does for modelers of WW2 German armour. Lets face it, no matter which method is used, it is seems difficult to pull off a good Zimmerit job. There have been several new and innovative products introduced over the past few years to make this job a little less troublesome. But first a little history may alleviate some of this fear. Zimmerit History Zimmerit was first made available during the summer of 1943 as a counter to magnetic and adhesive anti-tank mines. The British had an adhesive "sticky bomb" for this purpose, and the Germans had lost several panzers to it during the attacks on France and the Low Countries, Greece and North Africa. The Soviets may have received these sticky bombs from Britain as part of the Lend-Lease agreements. In addition, the Germans' themselves had a shaped charge magnetic AT mine and it was a common German practise to develop a counter to weapons which they themselves possessed. Most popular modelling literature has stated that zimmerit was a plaster or concrete, however this is not correct, according to a British war-time report, "'Zimmerit', Anti-Magnetic Plaster for AFVs", (reported by Major J.W. Thompson and Mr. C.E. Hollis, July 1945). In fact, zimmerit was a mixture of polyvinyl acetate, 25%, which formed the matrix, 10% saw dust used as a filler. Additionally Zimmerit included 40% barium sulphate and 10% zinc sulphide in the mix, but the report did not state why. Its dark yellow colour was achieved with the addition of 15% ochre pigment. Zimmerit was developed in Berlin by the C.W. Zimmer Company, (this was where Zimmerit got its name), it was ready for use in the summer of 1943. Zimmerit was applied to all tanks and closed top SP guns but rarely to anything else, however, there are photographs of a Marder III Ausf. M and a Sd. Kfz. 251 Ausf. D with zimmerit. Application was done at the factory, but it appears that many vehicles received field applications before zimmerit was actually available. There were orders issued late in 1942 that outlined several temporary measures for use before production zimmerit became available. Including the field application of readily available materials such as concrete, thick coatings of mud, and in winter conditions, thick build-ups of ice, (which would make an interesting model). This explains the variety of zimmerit patterns and applications on odd vehicles during the first half of 1943. |
| Production zimmerit was applied only to an AFV's vertical surfaces, and the protection gained was twofold: first, it created a rough surface and consequently reduced the area of contact - this defeated the "sticky bombs"; second, it put distance between the hull and the mine - this defeated magnetic mines. It is important to note that zimmerit possessed no "anti-magnetic" properties of its own, rather it defeated the mines in the previous manners. | 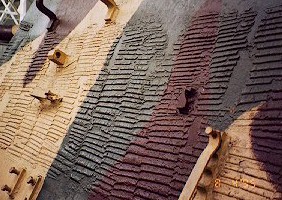 |
| In mid 1944, however, the application of zimmerit was phased out due to its being
rendered obsolete by greatly improved AT weapons. It is interesting and worth
noting, that the British were looking into the use of captured stocks of
zimmerit for their AFVs in the Pacific, however the war against the Japanese
ended before this plan could be implemented. Photographic evidence suggests that certain "standardised" patterns were applied to certain vehicles. This may have been the result of preferences at particular plants. Below is a table showing which vehicle received what pattern, (this is only a general guide, contradictions abound, photographs of a Panther Ausf. A with the ridged pattern exist for example). |
| Vehicle Name | Pattern | Note(s) |
| Brummbar | Ridged | All but early |
| Elephant | Ridged | Not on Ferdinand |
| Hetzer | Unknown | Not known if applied |
| Jagdpanzer (very early) | Checker | Early mantle vehicles only |
| Jagdtiger | Ridged | Possibly on Porsche suspension vehicles |
| Kingtiger (early, mid) | Ridged | All Porsche turrets and early Henschel |
| Panther D(late), A(all), G(early) | Vertical ridged with secondary cross-hatch | Ausf D rebuilds only |
| Pz III M, N (late | Ridged | Very rare |
| Pz IV H(mid/late), J(early) | Ridged | Sometimes on side skirts |
| PzIV L/70 (early) | Ridged | - |
| Pz Jg IV Ausf F | Ridged | All |
| Sutg III G (early, mid) | Waffle | - |
| Stug IV (early, mid) | Ridged, "zigzag" on hull sides | - |
| Sturmtiger | Ridged | Zimmerit left over from conversion |
| Tiger I (mid, late) | Raked on hull, ridged on turret | All late |
Survey of Zimmerit Depiction Methods Zimmerit has the reputation of being difficult to reproduce in scale. There are several methods, each with its own advantages and disadvantages. Here is a list of all the methods which I have come across along with their pros and cons. |
Cavalier Zimmerit Sheets A new product from Australia has recently been released by Cavalier. I have not seen these parts yet but they are described as being made of a latex material in sheets with the exact panels for a particular AFV kit moulded into them. |
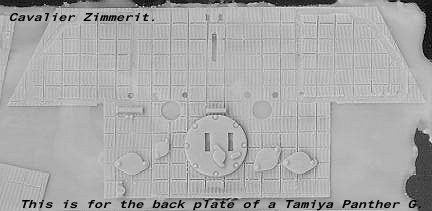 |
| I have heard that acrylic based paints like Tamiya Color turn glossy
when applied directly to these sheets; to prevent this prime with an enamel
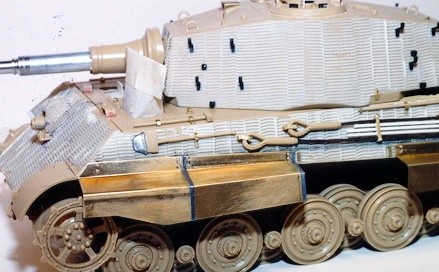
base first. Pros: Easy and realistic. Cons: Currently hard to find outside of Australia. Restricted to one pattern. Looks a little too thick. Hot Knife Scribing Method Often touted by Francois Verlinden, this method employs a hot knife to scribe the zimmerit pattern into the kit parts. For best results the hot knife should have a rheostat to control it's temperature. It is essential that a pattern is drawn on the model beforehand as a guide. The zimmerit is melted into the model's surface by following this pattern. The results are not very convincing, but it may have its uses for applying a pattern to thin styrene parts like schurzen which plastic putty warps. Pros: Free (assuming you have the tools.) Cons: Pattern looks fake. Only one shot at a good pattern. Easy to the destroy model. Difficult to model damage zimmerit. Injection Moulded Styrene Sheets Italeri started this trend with the release of their Panther Ausf. A which includes a complete set injection moulded zimmerit sheets and where appropriate, replacement parts. Italeri now include these as part of an accessory kit. At this point I believe that Academy have included a similar zimmerit set in there new Tiger I kit (however this is unsubstantiated.) The Italeri parts are a good first attempt, they are quite acceptable as is, however they should be thinned out by sanding from the back (much like a vacuform aeroplane kit.) Also the pattern is a little suspect - missing the secondary pattern of grid lines; which can be added by scribing before thinning them. Pros: Easy to use. Readily available. Cons: Expensive. Needs thinning out (at least Italeri parts do.) Need to modify for different vehicles. Putty Texturing By far the best method, and the one which I use exclusively, is textured model putty. This method looks the best because it is exactly the same way in which the Germans applied zimmerit to their AFVs' (in scale of course.) I can't understand why modelers are afraid of this method, it is not difficult, it just sounds difficult. Later on in this article I will fully describe the procedure. Pros: The most realistic DIY method. Free! Cons: Intimidating at first. Time consuming Putty Raking - "The Tamiya Method" This method is similar to the previous Putty Texturing method except instead of stamping the pattern in with a trowel it is made by dragging a serrated tool across its' surface. Tamiya produce a set of tools (catalogue number 35187) specifically made for this purpose - hence the name "The Tamiya Method". But any number of tools can be used including razor saws, corrugated metal, etc. The pattern produced looks good but personally I don't think it captures the true trowelled pattern well, however for those vehicles which received raked on zimmerit coats, such as on the Tiger I's hull, this method is perfect. A number of materials besides plastic and epoxy putty can be used with this method including "Spackle", which is a household patching compound similar to plaster. If mixed with Latex paint the material becomes more plastic and easier to use. The major benefit to using this material is since it is water based it can be washed off. Pros: The easiest and most fool proof of the DIY methods. Free! Cons: Only accurate for "raked" pattern, as on Tiger I hulls. Resin Replacement Parts Most notably, Kirin and Accurate Armour have zimmerit kits for several of the new popular kits (Tamiya Panthers and King Tigers.) While the zimmerit patterns are good, often they require more time to fix up, removing moulding lugs, filling in bubbles, and so on, than using any other method. In the case of Kirin's kit for the King Tiger, the engine deck has been simplified, so extra time in needed to reopen the air vents - fun stuff. Pros: Perfect zimmerit representation (assuming the guy who did the master was good!) Cons: Very expensive. Vehicle specific. Difficult to modify. Replacement kit parts often simplified. |
| R&J Products Zimm-it-rite or Miliput Fine Grain Epoxy Putty This material is currently available from R&J Products is very similar to epoxy putty, but it is much softer and a lot easier to work with. It is used in the same way as plastic putty in the Textured putty method. I recently obtained some Zimm-it-rite and have been testing it out. |
 |
| I have been most
impressed, it is the best method available currently for simulating Zimmerit.
I describe how to use this material in "How To - The Putty Texturing Method"
below. Pros: Excellent material for use with the textured putty method, as it has a long working life and doesn't affect the plastic. Cons: None. Textured Paper Dinner Napkins This rather strange method was described in an old issue of FineScale Modeler and employs paper dinner napkins embossed with the appropriate pattern. Once a good pattern is found, cut the napkin up into roughly the shape needed and coat them with something for strength; I tried plastic goo (sprue dissolved it liquid cement) and Krazy Glue, as the goo takes forever to set, I recommend the latter. Now trim to exact size and glue to the model. Pretty simple. This is the best method for smaller scales, 1/48th, 1/72nd and 1/76th, it is thin enough and there are patterns fine enough for these scales. Pros: Almost free. Easy. Fun to use (I tried it and it was!) Cons: Pattern may look soft. Restricted to one pattern. The Show Modelling Embossed Paper Sheets Being more popular than deserved, thus illustrating just how fearful the average modeller is of doing zimmerit, these "quick fix" zimmerit sheets show just how much expense some people will endure to get a fast and easy passable zimmerit job. While The Show Modelling should be praised for such an innovative concept, their execution is lacking. These embossed paper sheets just don't look convincing at all, the pattern is too indistinct. Additionally it is almost impossible to get the sheets, which do not stretch, to cover an area with compound curves (a surface which curves in more than one axis.) Pros: Easy. Was the best "quick fix" method until Cavalier's Zimmerit came out. Cons: Expensive. Difficult to fit to compound curves. Looks fake - too smooth. Zimmer-it Embossing Tools Now available for use with putties such as Zimm-it-rite are a set of patterned stamps, from a company called Zimmer-it. They can be used either as "combs" or "stamps" to texture the putty. I played around with them for a while but not enough to completely master them. I would recommend that you purchase them to try for yourself. |
| A Special Case - Early Jagdpanther Pattern Fortunately because of the simple nature of this pattern, (see the photograph to the right), it is very easy to duplicate with scribed sheet styrene. I have tried 0.015 stock cut to the same size as the hull plate I wanted doing and scribed in the pattern with the backside of and X-Acto blade and straight edge. To finish up I roughed it up with coarse sand paper and re-smoothed with steel wool. It looks very good and is a lot easier than trying to get a smooth, uniformly thick coat of putty. |
 |
Other Methods I have tried to be as thorough as possible and list all the zimmerit methods I know of, however time to time I learn about new ones. Usually I place them in the Tips & Techniques - Zimmerit section. There are a couple in there now so have a look. |
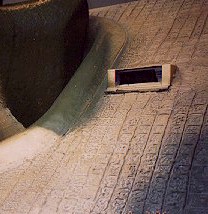
| The best method for modelling zimmerit in scale is by texturing putty. Here is a description of how to do it. Study some good photographs to see what small variations are specific to the vehicle, such as how the pattern forms around hull fixtures. The photograph to the right shows my Tamiya Pz.IV Ausf.J with Zimmerit applied using the textured putty method. I used plastic putty, in this case Squadron's Green Putty and R&J Product's Zimm-it-rite, (which are the light grey areas). |  |
| The Zimm-it-rite was the superior of the two materials because it had a much
longer working time -- hours as opposed to minutes as for the Green Putty. Also,
since it does not attack the plastic, it is very forgiving, Zimm-it-rite can
easily be washed off before it sets. I recommend Zimm-it-rite as the best
material for modelling Zimmerit. So, using putty, either Green Putty, Milliput or Zimm-it-rite, I recommend the use Zimm-it-rite however, follow the steps below to produce an authentic and in scale Zimmerit pattern. I wrote this description with Zimm-it-rite in mind, but I have noted differences in brackets for plastic putty, and for other epoxy putties the techniques should be the same. Planning Determine which details to fix before or leave off until after the zimmerit is applied. Generally small parts such as tools, headlights, mufflers, etc., should be fixed after, while parts that are integral to the hull such as Saukopf mantlets are best fixed before the zimmerit. Using the reference photographs as a guide, pencil in some guide lines. This may seem pointless since you will obscure the lines with putty but they do help you visualise the finished plate as you are working on it, thus keep the pattern consistent. If damaged zimmerit is to be shown then these areas should be masked off now. I use ordinary masking tape. Be sure to check reference photos to see how real zimmerit falls off too. Surface Preparation The surface should be washed to remove grease and then roughened up with coarse sand paper to give the Zimm-it-rite something to grip. This roughening up step is the key to a good Zimm-it-rite application, (for plastic putty: you can skip this step since solvent based putty dissolves the plastic). It is quite easy to fix stowage, tools and such on after the Zimmerit is applied if small squares of 0.015" sheet stock are glued to the points were these fittings are fixed to the hull. If you look closely at reference photographs you can see that this is actually how the tool racks are fitted, so there is a space between the hull and tool rack, (especially on Panthers). The putty is spread just thick enough to leave the tabs showing - after texturing the fittings can be glued directly to these tabs; referring to fig.1 below, note the tabs are circled in red. Also, just to be on the safe side, its a good idea to mask any areas where zimmerit is not supposed to go. Application Now it's time to apply the zimmerit! It is important to do one side per session, since soft putty is easily disturbed when handeling the model. For each of the standard patterns there is a slight variation. If you goof up or do not like the pattern then Zimm-it-rite can be scraped off easily and reapplied, (for plastic putty: scrape the putty off right away, let the plastic harden up and sand smooth). Make a trowel from scrap sheet stock, 0.030 is best, the business end should be around 5mm in width and sanded to a taper, (for plastic putty: make several, as this putty tends to destroy them). Select on logical area to work, such as an entire hull side, and apply the Zimm-it-rite. The best tool to use is your finger, just push it on and around until it covers the entire surface. Now smooth it out, the best tool I have found for this is an artist's paint knife, (check at an art supply store). It is important to wet the tools with water and to keep them clean. If you had previously applied the small tool-tabs then you will notice that this smoothing out process cleans and leaves them exposed. Expect to spend up to one half an hour getting the application of Zimm-it-rite smooth. The actual thickness doesn't really matter but it does have to be uniform. For complex surfaces such as the front of the Pz.IV (see photograph above) I find that an X-Acto knife is the best tool for application. Getting a smooth coat of uniform thickness is the single most important factor with this technique. So lots of practice beforehand is essential. If you are starting out then it is best to try a clean flat surface first, like the Kingtiger hull side below, before something more complex. For plastic putty the technique is a little different. Since this putty dries within minutes, only small areas can be worked per application. Basically follow the patterning methods below but apply small squares about 30mm x 30mm and press the texture in after a "skin" has formed. Leave a bit of the putty unworked to blend into the next application, apply another section, texture it and continue until the surface is done. Using plastic putty has no advantages over Zimm-it-rite other than it is essentially free - but it is quite troublesome and a lot of practice is needed to master its use. |
 |
Ridged Pattern (Most prevalent) I find that Zimm-it-rite textures easier if it is left to set up for about half an hour, (this time will vary depending on ambient temperature and the amount of mixing done). Water prevents Zimm-it-rite from sticking to the tools so it is essential that the trowel be kept wet and clean. Wetting the Zimm-it-rite beforehand will help to prevent this from happening too. |
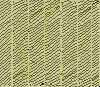
| Hold the trowel perpendicular to the surface and gently press in the ridges, being careful not to push the putty around the model, if it does move then wait a short time for it to set up a bit more. Start at the top of a column and work down until the entire column of ridges is done, then move to the right and start another, (I suppose if you are left handed then move to the left). | 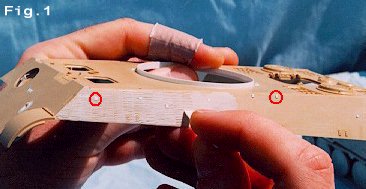 |
| When done remove any masking tape while the putty is still soft. That's it! Easy! |
 |
Panther Pattern Almost the same as for the ridged pattern, but the ridges are vertical and a secondary grid pattern must be over laid. I find the second pattern easier to make with a straight piece of 0.010 stock. The Zimmer-it stamps for the Panther pattern from R&J could be used too. I tried them out and they seem to work well, but I did not spend enough time to master them. |
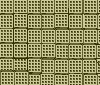 |
StuG III Pattern Using the same technique as for the Ridged Pattern, but make a different trowel. Take a 7mm x 7mm square of very thick stock and saw the "waffle" pattern into it. Mount this onto a handle made from sprue and use it as a stamp to create the pattern. There is a set of stamps available with this pattern from Zimmer-it. |
 |
StuG IV Pattern Using the same technique as for the Ridged Pattern, and the same trowel, but angle the trowel at about 45deg. Work up a column, move one column over and then work down, thus creating the zigzag pattern. I find that this kind of pattern looks better if the putty spread on a little thicker, (don't ask me why). |
 |
Early Jagdpanther Pattern Make a different texturing tool from a long straight piece of 0.010" sheet plastic, sandwiched between 0.020" sheet stock for strength, (be sure to leave the 0.010" exposed). Use this tool to impress the checker board pattern into the Zimm-it-rite. |
| Finishing Set aside to dry, usually over night. Do another side the next day, it should take about a week to do the entire vehicle. Remember, do not touch it in anyway until it is dry. I usually sand the Zimmerit surface lightly to remove the rough edges and even it out a bit and then gently go over it with steel wool to round the edges again. If there are any methods I have missed please let me know. I'll try them out and update this article. Good luck with your next zimmerit project. Written by Paul A. Owen January 1996. Zimm-it-rite sample photograph Mark Ford 1996. Jadgpanther and Jagdtiger photographs by Rob Mackie. 1996. |