| Polishing Gloss Finishes |
| Polishing Gloss Finishes |
| HOME | ARTICLES | GALLERY | LINKS |
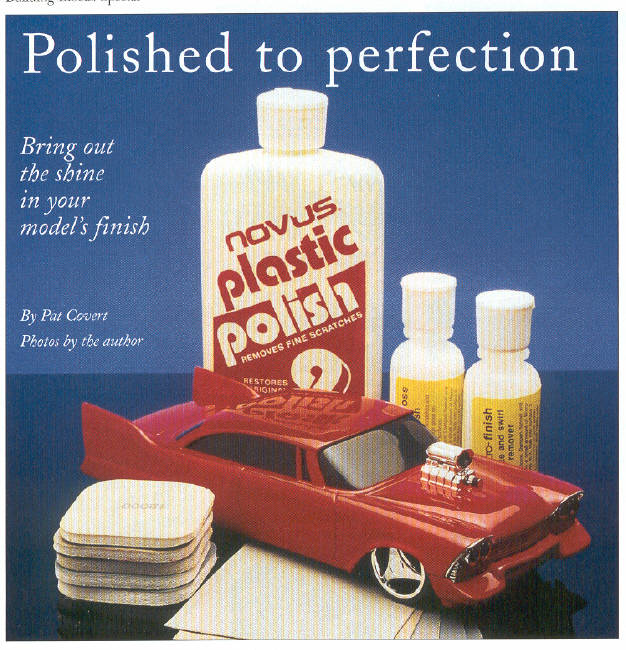
Most newcomers to our hobby are blown away when they attend their first show and see the amazing, highly polished finishes found on automotive models and racing aircraft. Don't be intimidated, however -getting a mirror-like, high-gloss finish on a model these days is easier than ever before, due mainly to the advent of the polishing kit. These kits come in a variety of configurations, or you can customize your own -but they'll all use the same method for polishing out a gloss surface. Polishing, or "rubbing out," a gloss finish is essentially a four-part process. First,a coarse grit levels out any texture found on the surface of the paint. Second, a succession of finer grits continuously remove scratches in the surface until there are none. Third, a polish removes any haze and minute scratches left by the sanding process. Finally, a wax or protectant is to bring the paint up to fullluster. Polish your nerve. If you've never polished out a paint job before, you probably find the thought of sanding on such a small, fragile surface a bit scary. Don't worry. The grits in a polishing kit are relatively fine to begin with, and the finest or its are virtually indiscernible to the touch from one to the next. Like all modeling processes, practice is the key -so jump in and get your feet wet. Our test model is an AMT/Ertl Plymouth Street Fury with all of the trim removed for a clean, oh-so-smooth look. The body is painted in Tamiya Italian Red (TS8) aerosol lacquer. The paint job is already very slick right out of the can, but virtually any paint is going to impart some level of texture -the Fury definitely had a random texture that could be improved. Follow along as we polish our little Plymouth's paint job to perfection! 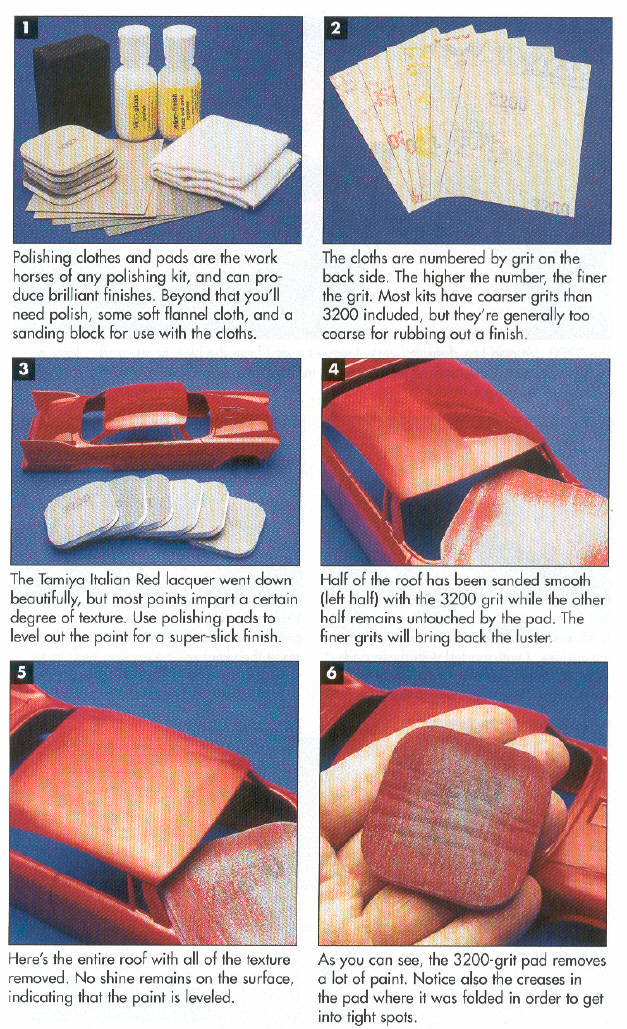 Leveling the paint Before you pick up the first sanding pad, it is important to make sure you have adequate paint depth or you'11 sand through to the primer and plastic. Typically, an enamel paint job should have four to five wet coats of paint applied to the surface. A lacquer paint job should have more, because lacquer is applied in much thinner coats. If you are at all in doubt about the depth, try your first polishing job on a scrap piece of plastic and give the process a run-through before working on the model. Sanding mediums come in three basic forms: cloths, pads, and sheets, 1. Both cloths and pads have a fabric backing that allows the surface of the medium to conform to the contours, though sanding sheets have a clear acetate backing that tends to make them stiffer. This makes them harder to use during the sanding process. I much prefer the fabric- backed cloths and pads, 2. Of the cloth sanding grits, my preference is the sanding pads. These 2" x 2" pads have a foam core sandwiched between two layers of sanding medium, 3. I find them much easier to manipulate than the sanding cloths, which are used in conjunction with a foam block. The downside to using the pads is wet sanding- I have had the grit cloth separate from the foam core with repeated wet use. Both cloths and pads work fine, however, and they are equally effective. I suggest you try both to see which fits your fancy. Two companies, Micro-Mark Tools and LMG Enterprises, offer their customers a choice of cloths or pads. Other companies offer sets of cloths and pads separately. Wet or dry? There has always been a question when using a polishing kit of whether to wet-sand (in wet-sanding, constantly wet the medium with water to flush particles from the sandpaper grit, keeping it consistently abrasive) or to dry-sand. It's easier to gauge your progress when dry sanding, and I recommend that beginners use this technique initially. By doing so, you'll get a better feel for exactly what the sanding mediums are actually doing during the process. I prefer to dry-sand with the first grit just to make sure my surface has been completely leveled. From there, I wet-sand -it's quicker because the grits stay cleaner as you work. Wet-sanding also extends the life of the cloth because it washes away much of the residue that tends to clog up the grit. Regardless, it's strictly matter of personal preference and has no noticeable impact on the quality of the finished surface. The fIrst sanding grit is the most critical one you'll use because its purpose is to level out the entire painted surface. Successively finer grits are used to remove-one by one -surface scratches from the painted surface. In most instances you will start with the 3200 grit, which works well for removing a typical amount of texture. If you have a particularly slick paint job to begin with, you may wish to start with the 3600 grit. Begin by sanding the area with backand forth strokes -never sand in circles! The sanding stroke will vary in width depending on how much surface area you have to work with. The broader the panel, the wider the stroke, 4. With these fine grits you can reverse direction, but don't crosshatch if you can help it. As you begin sanding, you will note that a dull texture will appear on the high spots of the paint while the low areas remain glossy. Go slowly at all times and inspect your progress as you go, 5. Keep sanding until all the gloss in the low spots has been removed. Be especially careful sanding around sharp edges and high spots -the paint is thinner here, so it's much easier to cut through to the primer or plastic below. On the plus side, paint is generally smoother around these areas so you can just sand close to them. When necessary, fold the pad or cloth (without the sanding block) or use just a corner of the sanding medium to get into the tight spots, 6. The goal is to sand the entire surface (with the exception of the previously mentioned high spots and edges) until it is consistently dull all over, 7. This is the prime indicator that the paint has been leveled. Repeat this process on each panel until all surface texture has been removed. 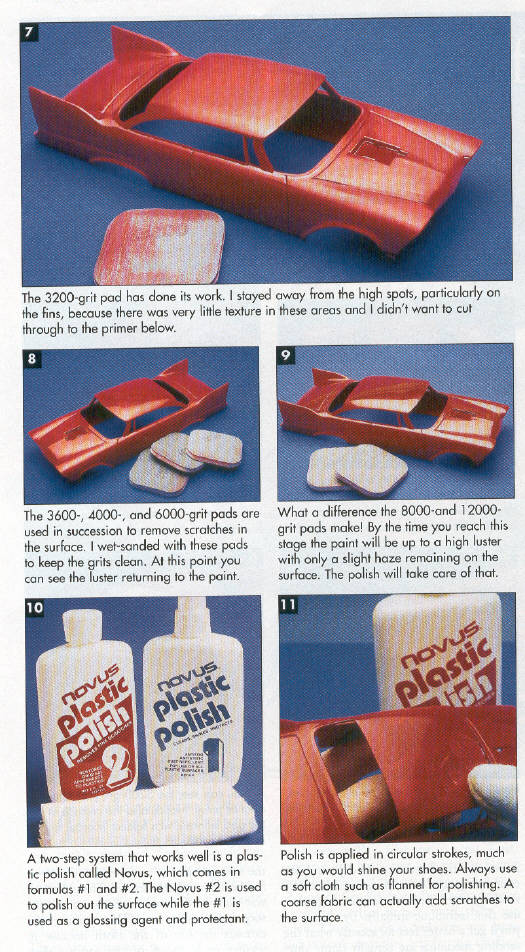 Removing scratches. The purpose of the remaining cloths or pads is to remove all minute scratches from the finish. This is done by using successively finer grits to sand the surface until it's scratch-free. The sanding process continues as you move up through the numerical succession of sanding cloths (the higher the number, the finer the grit). You won't I need to spend as much time using these grits as you did sanding with the first one. The 3600-grit cloth will remove any scratches left by the coarser 3200-grit cloth. Mter you have sanded the entire body using the 3600-grit cloth, you'll do the entire process again using the 4000 grit cloth. From 4000 you will move up to 6000, then 8000, and finally 12000. Never skip a grit in the sanding process -you'll end up with scratches that can only be removed by going back and re-sanding with the previous grits. Watch carefully as you go from one grit to the next and you'll notice the scratches getting finer and finer along the way. This is a sure sign you're on the right track. You will start seeing the gloss return to the paint by the time you have finished sanding with the 6000- grit sanding cloth. The 8000 and 12000-grit cloths restore virtually all of the glossy shine to the surface and leave only a haze that must be polished out. At this point you will really begin to appreciate the benefits of the polishing kit. Polishing. The purpose of polish is to remove any haze and extremely fine scratches left by the final sanding. There are a myriad of polishes to choose from, some that are supplied in polishing kits and others th:at are available separately. LMG Enterprises supplies both a polish i and an anti-swirl and haze remover with ~ its polishing kit. The polish is meant to I remove any scratches left by the sanding grit, and the anti-haze and swirl brings a high-gloss to the surface. Polishing paint is very much akin to shining your shoes. Stick your finger into a f soft flannel cloth, add a little polish to the '" tip of your finger and go to town, 11 . ~ Unlike the sanding procedure, polishing is done using circular strokes. Polish should be rubbed into the surface of the paint i using medium pressure. Just as when vou~ were sanding, care should be taken not to rub too hard around the sharp edges of parts where paint tends to be thinner. Once you have fully polished out an area, switch to a clean area of the cloth and buff away any excess polish. This final buffing should reveal a blazing shine, 12. Note: always test products not specifically made for scale automotive finishes on painted i scrap ,plastic. Certain polishes may be too harsh for use on softer paints such as hobby enamels. An ounce of protection A gloss protectant will add more shine to your model and will help safeguard the finish as well. If your polishing kit did not come :'.supplied with a protectant, purchase one. i Protectants usually fall into two categories: wax-based and silicone-based. The Last Detail Final Treatment Wax is a carnuba-based wax that works well for both adding gloss and protection. Novus #1 is a silicone-based protectant that adds a glass-like finish to the surface, 13.Protectants, like polishes, are applied with a flannel cloth, and you'll use the same circular motion when applying them. I recommend using a separate cloth rather than the one used for applying polish to eliminate the possibility of contamination between the two. I keep an abundance of flannel on hand just so I can use a clean piece for each application -this cloth is inexpensive and readily available at your local fabric store. Once applied, a protectant will give the painted surface a super-high shine and help protect the model when handled, as ] well as from extraneous damage such as 1 oxidation. These products do indeed vary ! in consistency and chemical make-up, so 1 practice a bit with them. Approved narcissism. Okay, so I need to add an additional step -I mean, what good is applying a great finish to a model if you can't sit back and enjoy it? Once you've got your model assembled, spend a little quiet time with it. I usually set this time aside on a Friday night around the house. First, I'll put on one of my favorite CDs, one that reflects the mood of the model I've just completed; rock and roll for a '32 Deuce, hard rock for a street machine, jazz for a sports car or. .. well, you got the picture. I'll then set the model on the coffee table in front of me and reflect on the build. If you try this practice, all ofit is made much more pleas- urable when you've got a killer finish, so get out that polishing kit and add some brilliance to your project. 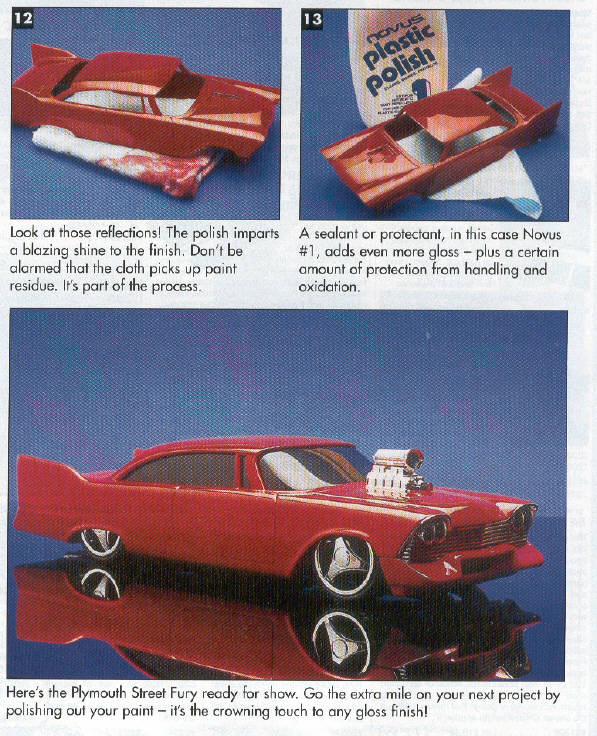 |