| Using Future |
| Using Future |
| HOME | ARTICLES | GALLERY | LINKS |
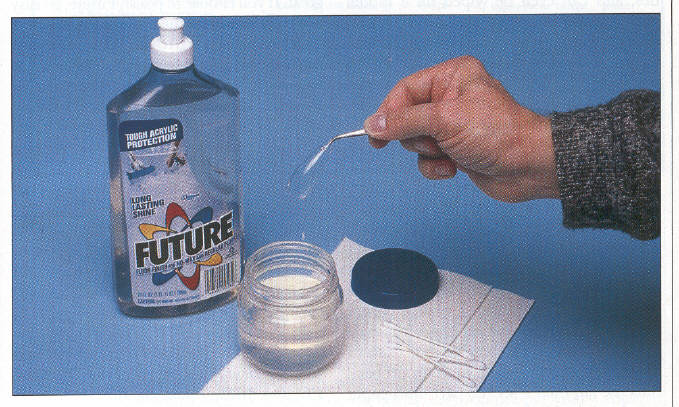
What's so great about future? You've probably seen future acrylic floor polish mentioned a hundred times in finescale modeler. so what's the big deal? obviously, Future (made by s.c. johnson wax) is not made for modeling. It is awater-clear liquid acrylic that is designed to add "shine" to synthetic floor coverings that can't be waxed and buffed as old-time linoleum could be. when spread onto the flooring in a thin coat, the liquid sets quickly and retains its glossy shine under foot traffic. Inexpensive clear gloss. In effect, Future is a form of liquid plastic. For modelers, this is great news. My first experience with future was as a clear gloss overcoat back in 1983. I had built a 1/144 scale convair 880 from the microscale kit(remember that one?) and had experimented with polly s waterbased flat white paint for the overall scheme. I had to apply a clear gloss before decaling, and I was worried that my then-favorite clear coat, Floquil crystal cote, might damage the acrylic paint beneath. when i heard about using future as a clear gloss, i made a trip to the supermarket, loaded a little Future into my airbrush and sprayed away. after a few light coats, i was unimpressed with the gloss. I sprayed on a little more and put the model down and let it set up. When I checked it a couple of hours later, i couldn't believe the shine. It seems that future has great self-leveling ability and it takes a little time to smooth out. It also helps to lightly wipe down the model with a slightly damp lint free cloth prior to sprayig the Future as is helps to reduce the surface tension and allows the Future to flow out more readily. A clear acrylic gloss coat also seals underlying paint and decals if you should want to apply an oil-base "wash" -a very thin, dark- colored paint to accent recessed detail and visually add depth to the model's finish. Canopies If you have ever seen a contest model that has a canopy that sparkles in contrast to its flat camouflage paint, it most likely has been "dipped" in future before the frames have been painted. future fills fine scratches, making the plastic seem even more clear than it was to begin with. also, future seals the clear plastic and reduces the amount of deposits that eventually cloud clear styrene. Future has a couple more benefits when 1used on clear parts. You may know that it is not wise to attach clear parts with super glue. super glue gives off a precipitate during the curing process, and this accumulates on impurities on the clear parts' surfaces. ~(this property is why super glue is used by ~crime investigators to enhance fingerprints!) well, the last thing you want is a ftosty white fingerprint on your canopy! a coat of future on a canopy forms a barrier that does not attract the super glue precipitate. this is an advantage when you need to super glue clear parts to your model. If clear parts you are attaching to your model don't require a strong bond, use a coat of future for the adhesive. it's sticky enough to hold parts together -as long is there is no stress applied to the joints. Applying Future Future is thin enough to be airbrushed straight out of the bottle, but some modelers prefer to thin it with denatured alcohol. this will delay the drying process some. In addition, you can "tone" down the gloss by adding a bit of Tamiya Flat Acylic Base tothe Future. Future has great self-leveling properties, and can even be wiped on a model with a brush or cotton swab. watch out,though; future sets up quickly and repeated strokes with the brush cause brush marks or "fuzzies" if you use the cotton swab. Brush it on quickly, Set the model down, and let the magic happen. Do the dip One of the first things I do when I open a new kit is to treat the clear parts to a bath of Future. I "decant" future into a wide-mouth sandwich- spread jar (after consuming the spread) and use this as the "bath." After washing the clear parts in Windex or ammonia water (to remove finger prints and oils that might repel the Future), I grab a corner with tweezers and quickly dunk the part into the Future bath three or four times. i allow most of the future to drain off back into the jar, then i set the part onto paper towels to absorb the excess liquid polish. After the Future has set for a couple of hours, I examine the part for blemishes. Sometimes I find specks of dust embedded in the Future coat. That's easy to f1x: soaking the part in ammonia water for a few minutes loosens the future and you can simply wipe the part clean and repeat the process. Paints stick well to Future-coated canopies, so i seldom have problems painting the framework. I use bare- metal foil for masking canopies, and i've found that little adhesive is left behind on the Future if i remove the foil mask within a couple of days of its application. Decal setter Decals should be applied to glossy surfaces, and a cured overcoat of future is an ideal surface. However, future can also act to soften decals and make them conform to raised and recessed detail. once again, you have to work fast as Future sets up quickly. simply apply a drop of Future to the model, slap down the decal, quickly get it into position, then place another drop of future over the decal. the effective plastic "decal sandwich" seems to become part of the model's surface. Of course, if you need an overall flat finish, you can apply clear flat over Future after it has cured. You can even create your own clear flat version of future. mix either tamiya or gunze sangyo aqueous "flat base" with future and you have a clear flat coat that can be brushed or airbrushed onto your models. the amount of flat base you mix is up to you. Cured future can be polished just like a gloss paint, but Future's bond to paint is not great. If you choose to polish Future, go easy with dry, extremely fine sanding pads. Removing Future. After airbrushing Future, I immediately clean out the tool with Windex. The ammonia in the Windex dissolves the future. you can clean brushes or remove Future from clothing and work surfaces with Windex or ammonia and water. |