| Airbrushing 101 |
| Airbrushing 101 |
| HOME | ARTICLES | GALLERY | LINKS |
Everyone seems to think that airbrushing is some "black art". Let me first tell you that it is real easy that anyone can master if they just adhere to a few basics techniques and guidelines. This is not an all inclusive article, but I hope it answers most of your questions and hopefuly eveyone will benefit from the tips on here. EQUIPMENT: First thing is the type of equipment to get. There is some expense involved and it represents the first major step for the model builder in improving his work. I will outline ways to save money, but there is a certain minimum expense you must incur. Airbrush Types: Airbrushes come in basically two types: Single Action and Double Action. Single action types are the simplest to use and the least expensive types and in most cases will accomplish the majority (90%) of your airbrushing porjects. Single action means that you can only control the air on or off with the control button. Paont amount is controlled manually by a knob you turn and stays constant. Some single action units also have a little knob that can control the amount of air also, but it is manual also. Most of these airbrushes are wahr is called "External mix" in that the paint and ir are mixed on the outside of the body of the airbrush. I have a Binks Wren B unit just like described that I purchased over 35 years ago that I still have and use on most of my modeling. I have only rebuilt it once and replaced the hose about 7 years ago. See the picture below. 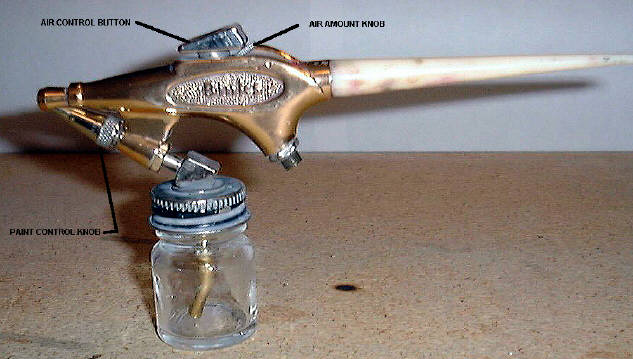 You control the amount of paint with the knurled knob shown. The air control button is simply an on off switch that you depresss. The small "limit" knob below the control button allows you to control the amount of air somewhat. This is helpful in controlling the width of line you can paint. All good single actions have this feature. I like this airbrush because it is rugged and is great for painting large areas quickly and evenly, but is also capable of drawing a line only 1/4" in width. I use this airbrush to do freehand camouflage on armor and even some planes. It is great for fade jobs on cars. Unfortunatley you cannot buy this airbrush nowadays, but there are others just as good made by both Badger and Paasche. 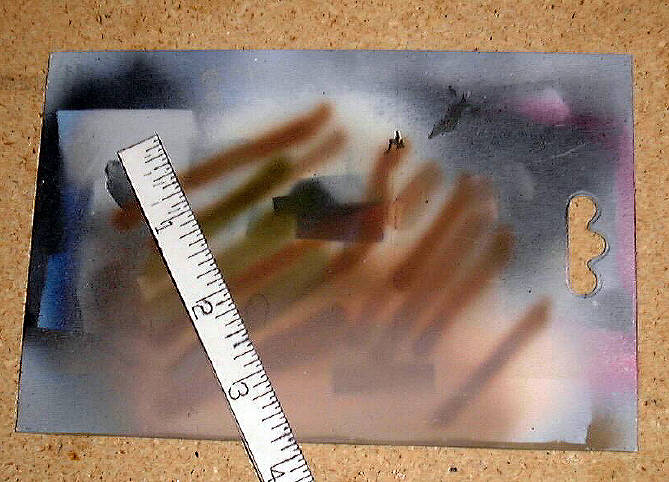 This picture shows what a good single action airbrush can do. Note the width of the brown lines on my test card. This is what I used on the Panther tank shown on these pages. Some other single action external mix airbrushes are shown below. |
 Paasche Model H |
 Badger Model 350 |
There are also single action internal mix airbrushes available which offer a bit more
control at a higher price, like the one shown below. I do not recommend these, because
I think the minor improvement in performance is not justified by the additional cost.
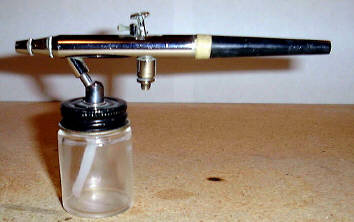
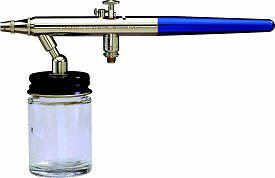
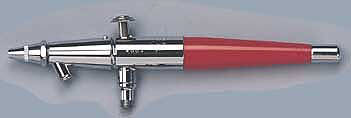
 Badger Model 200 Single Action Internal Mix The next step up in performance and cost is to go to a double action airbrush. All double action units are internal mix by design to allow very fine control of both paint and air flow. In these airbrushes the control button is depressed downward to turn the air flow on and off and also "rocks" backward against a spring action to vary the amount of paint flow from completely off to full on. You can also adjust the level of full on. This allows the modeler to really control the size of the paint lines. You can get lines as thin as 1/32" to 1/16" or as wide as the sigle action external mix ones. These units are used almost exclusively by artists because of their fine control. The spray pattern is very controlled and you can do much more with these units that the single actions cannot. I very rarely use my double action because it is more difficult to clean and setup, but sometimes I have no choice like when I am painting free hand camouflage on small panes or armor. I used it on the Spitfires, Hurricane, and P-40 as well as the small armor on these pages. I purchased a Chinese clone of a Badger double action airbrush about 6 years ago form Harbor Freight Tools. At the time a good Badger or Paasche double action was going for about $50-70. I got this clone for $30. All the Badger parts and bottles fit it. You may still be able to find these. The airbrush is shown below. |
 Chinese Clone of Badger Model 150 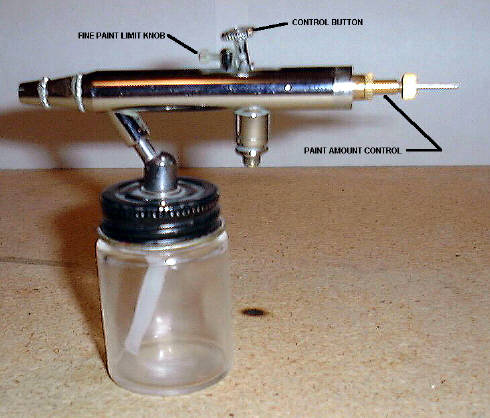 On these airbrushes you depress the control button to turn on the air flow. You then "rock" the button backward to turn on the paint flow. The further back you rock the knob, the more paint comes out. The paint amount control knob controls the upper limit of the paint flow. The more you turn it out the more the control button will rock backward and the more paint will flow. You can also use the fine paint limit knob to set the lower limit of the paint flow. You can "preset" the lower limit to a small amount of paint to draw a thin line of constant width by just depressing the button and not rock it backward. You can use this feature to paint little "dots" by just presetting the amount of paint and just depressing the control button in little quick strokes. This is great at reproducing the "mottled" camouflage effedct on German WWII aircraft. If you get real good at this action, you can depress the button and just rock the knob backward and hold it at the proper setting or you can vary the width of the line or size of the dot by varying the amount of "rock". As you can see these airbrushes are very versatile and can do some really fantastic effects that no other tool can do. Other examples are shown below. Of these shown the Paasche is the best and the industry standard. On the Paasche you can install different size needles for different paint flows. I do not know if the Badger has this feature, I know that my clone does not. |
 |
 |
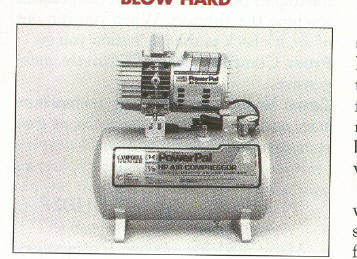
Okay so which airbrush should you get? Well it all depends on the type of modeling you are going to do and how much you want to spend. A good single action external mix will cost you between $20-40, while a good double action internal mix will cost between $40-60. If you got the coin then it would be ideal to get one of each. Like I have said I use the old relaible single action on maybe 95% of my model work. It is a snap to clean and set up. As you can see from the examples I can dial that sucker down to 1/4" wide line (sometimes if the moon and karma are right) I can beat that to 1/8" on a good day. If you build only cars and big scale stuff, then the single action external mix will be more than adequate. If however, you plan to do a lot of smaller scale stuff with camoflage and intricate paint jobs, then the double action internal mix is the only way to go. One thing to remember is that the double action will require more meticulous cleaning and maintenance and is more sensitive to paint viscosity as compared to the single action external mix. (More on this later on.) Air Sources: Once you got the airbrush, you will need a good source of compressed air. There are a number of alternatives that work well. The primary factor in choosing one is your budget. First off let me say that DO NOT EVEN BOTHER WITH THOSE PROPEL CANS. If you cannot afford another air source, then do not bother to get the airbrush and stick with the apray cans or brush painting. You will only waste your money, time, and patience with those things. Save your money until you can get a proper air source. The best source is a compressor. There are basically two types. Those designed for hobby and airbrushes in particular and the larger general purpose air compressors that can do other things too like powering pneumatic tools, inflating tires, etc. I have used both with good results. I use to have a big tank type compressor which I used in my furniture shop and a smaller hobby type. I now use the smaller hobby type because it is smaller, quieter, and works just fine for my particular situation. It is a W.R. Brown model that I got on e-bay for $45.00 which is a bargain. I would never pay retail for this unit as I can get a larger tank model at WalMart for around $100.00 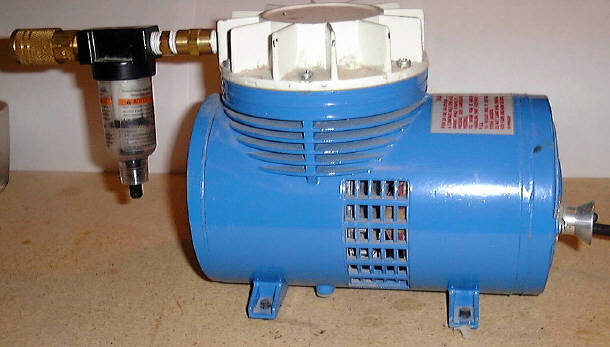 This little unit puts out about 30 psi constant pressurewhich is more than adequate for supplying one airbrush. I added a water trap and a quick disconnect with matching male air nipples (no dirty thoughts!!) that I got from Home Depot for about $20.00 and was good to go.. I would still have to get the water trap and quick disconnect tfor the WalMart unit anyhow so the additional cost did not enter into the equation. It fits neatly under my hobby work area and is quiet tenough that I do not have to turn up the stereo or TV to drwon it out. The pressure is just right that a pressure regulator wa unnecessary. If you are not lucky enough to get one of these at a bargain price or have the need for a larger compressor with a tank then one of the following might be right for you. |
 |
 |
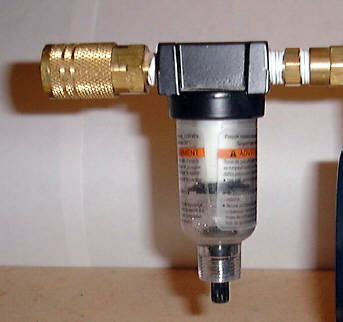
The unit on the left is a standard Campbell Hausfield tank type compressor. These vary in size and hp from 1/2 to 2 hp. They can get large and cost anywhere from $175 to over $300., and are available at your home center like Home Depot. This is normally overkill for airbrush work, but if you want to power tools then it is the unit for you. The unit on the right is a smaller unit that is available at WalMart for around $100.00. Both have built in regulators, but will need a water trap. ( More on that later on.) I feel that the WalMart unit is a best buy type unit unless you can get a hobby one for a good price or arre crowded for space. Another low budget air source is the refillable air tank. These have to be refilled from time to time and are illegal in some areas of the country. They do not have regulators on them and do not supply a constant pressure and require a water trap. I imagine you can setup a quick disconnect for the regulator so you can disconnect it tor refilling but that is the point, you have to refill it . Nice thing is that it is silent and relatively sheap at around $20-30. I thought about getting one as I have a bigger compressor that I could use to refill it, but I decided on the dedicated smaller unit which I got for a good price. 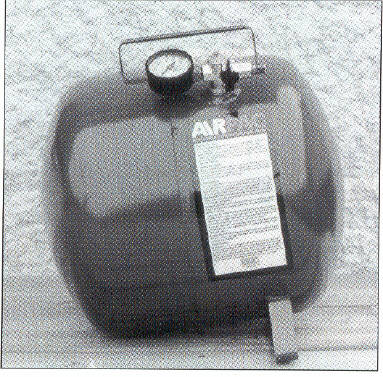 PORTABLE REFILLABLE AIR TANK Another variation on the refillable air tank is the CO2 cannister high pressure tank. These are big tanks that you get refilled at a Carbonic gas place. These are the people that supply the "fizz" in soda. You normally "lease" the use of the tank for a small fee and pay for a refill. You basically bring back the tank and they give you a new filled one. You also need a high pressure regulator that you either have to buy or lease from the gas guy. Nice thing about these tanks is that they are silent, last a good long time and do not require a water trap. The gas is normally CO2 which works fine. I thought about this option also. I know a T-shirt artist that swears by these things. The other drawback is that they are heavy when refilled. I also know of a guy who used an old scuba tank, but getting those refilled is a pain and more expensive as you need to have the tank certified and refilled at a scuba place. If you can get your hands on a scuba tank with a valid certification sticker with a regulator at a garage sale this might be a good option.  REFILLABLE CARBONIC GAS TANK Finally the ultimate in air supplies is the Silent Aire type compressors. These are what the airbrush artists use. They are high buck versions of the tank compressors. They run whisper quiet, have built in regulators and water traps. But they are not cheap and run about $500.oo, but they are great and normally can power multiple airbrushes at one time. I once saw one in a pawn shop for about $200, but the guy would not let me test it before buying. 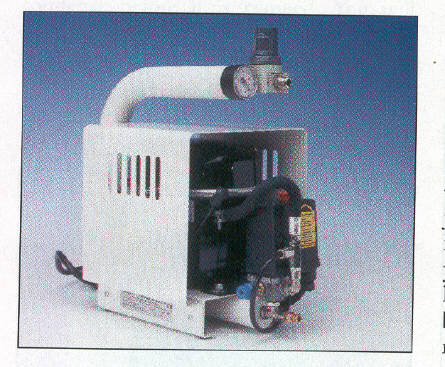 PROFESSIONAL ARTIST "SILENT AIRE TYPE" COMPRESSOR No matter which air source you use (with the exception of the last two options above) you will need a water trap. This is essential as when you compress air you also compress the water vapor always present. Depending on the humidity you can get a lot of water in the air and without the water trap you will spray it through the airbrush which will ruin your paint job real quick!! The ssame will happen if you forget to occasionally drain the water trap also. Been there done that!! Fortunately they are cheap and you can get them at any good home center. Like I said I equipped my little compressor with one and a quick disconnect and mating air nipples for each airbrush for about $20.00 at Home Depot. If you want to get fancy you can get a combo twater trap/regulator for a little more money. I did this in my old home when I was using the big compressor to power my airbrush. I ran an air line from my big compressor to a combo regulator/water trap mounted near my hobby work area . The compressor was in the shop and the work area was in the house. This was neat cause I could adjust the pressure right in front of me and I had the same quick disconnects. A word on those little in-line things. DON'T BOTHER WITH THEM!! They are almost as expensive as the ones from Home Depot and are not nearly as effective. |
 |
 NOTE DRAIN PLUG AT BOTTOM |
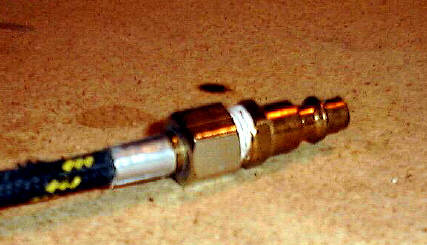
One last thing be sure to use Teflon sealing tape on all the plumbing joints to eliminate any air leaks. That is the white stuff you see at the joints in the pictures. TECHNIQUES: Okay you got your airbrush and compressor and you are itchin' to try it out. I will outline her somebasic techiques that have worked for me throughout the years. The key word is patience. Without that you will not succeed. Paint Thinning You will have to first thin the paint to the right viscosity to be sure that it will feed through the iarbrush properly and flow onto the surface of the model evenly. This seems to be a sticking point with most first time users, but again this is not rocket science just remember to kepp it simple. For most enamel paints the Testor's recommended formula seems to work just fine. That is: Gloss Colors:3 parts paint to 2 parts thinner Flat Colors:3 parts paint to 1 part thinner Different brands of paint have their own recommendationswhich you should follow. I almost always use the recommended brand of thinner as some substitutions will require testing for compatibility. I have found that enamels respond well to good quality mineral spirits. (not the odorless kind). Other paints require different thinners and ratios. Acrylics like Tamiya I use plain old isopropyl alcohol and add just enough thinner as outlined below. Lacqers like automotive have basically a 1 to 1 ratio of paint to reducer. Some paints like metalizers are airbrush ready. I spray these directly out of the bottle as both my airbrush spray bottle tops fit the standard Testor's bottle. Okay so your brand of paint does not recommend a mixing ratio, well no big deal. You want the paint to be the viscosity of milk. Here is how you can tell if it is right. Pour a little milk into a clear glass. Take a spoon and run some milk up the insides of the glass and notice how it runs down the sides and covers the area. You will note it is kinda thin and semi transparent. This is what you are looking for with paint. I normally pour the paint into the spray bottle (about 1/4 full) and add thinner with a pipette a little at a time or using the ratio above. I then stir it well with a stir stick made from a popsicle stick and then run a little up the side. If it looks like the milk example it is right. At first fo easy on the thinner if you are not sure adding a drop at a time and stirring until it looks right. This consistency works well for overall large area coverage. I have found that for drawing thin lines or smalll dots like camoflage where you are gonna really crank down on the paint flow and air flow, that the paint shouls be a little thinner. A few more drops normally does it. Special oversprays like washes and weathering and such require significantly more thinning to get the required effect. Spray Techniques I start with the paint nozzle fully closed and open it a half turn at a time and spray onto a piece of cardboard to see the pattern. I spray anywhere from 3-4 inches away from the surface and for general overall coverage I look for a width of spray of 1-2 inches wide with good coverage and no runs. if the paint does not come out or only a little, I open up the paint nozzle a little more and try again. If the paint does not come out check for clogs (Remember to thoroughly clean your airbrush after eacn session. More on this later) or thin the paint some more and recheck. Also check to see if the little hole in the top of the spray bottle top is open as this allows air pressure to come in and push the paint up the tube. Once you are happy with the pattern it is time to paint the model. This technique is the same for all paints whether tey are primers, glosses, or flats. See the diagram below. 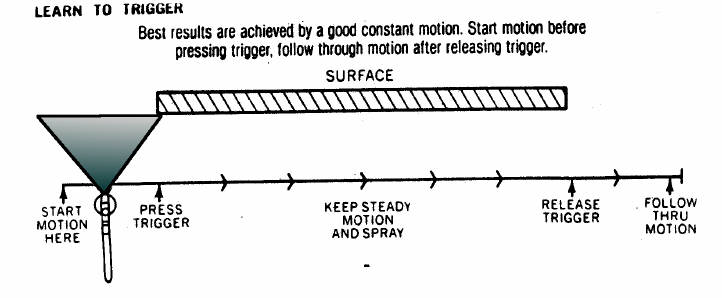 I first put on what is referred as a dust coat or mist coat. This coat sorta prepares the surface for the thicker color coats. Here is where the patience comes in. I spray on several thin coats and slowly build up the finish to a nice even coat. Flats and primers are relatively easy and forgiving. Glosses require a little more technique in that you want the last coat to look "wet" as this insures that it flows out for that real nice surface finish. On cars I start spryaing the top and then move down the sides an front a nd back. I use a wirte stand to hold the body and tilt it so that the sirbrush is flat or pointed slightly downward. Sometimes it is necessary to let the model sit about 30 minutes or so before additional coats. Check out the article on rubbing out and polishing gloss finishes. Camoflage is a little trickier. On most large area painting, I use full pressure with the air contol at full open. (About 30 psi) When I do camoflage, I just crank down both on the air contol knob and paint flow knob. Here is where a regulator comes in handy as I have cranked down the pressure to as low as 15 psi with some thin acrylics like Tamiya and Guze Sangyo. With less paint and less air you can get real close to the surface in order to get that thin line, sometimes as close as 1/2" to 1" without the fear of runs. Again test it on the cardboard. Here is where practice is necessary to develop your technique. With a good double action airbrush you can draw a line 1/16" wide. Reemeber to thin the paint a little more and crank down on the air pressure and paint nozzle. On a good day you can get a 1/32" wide line. Here is a little test that came with my double action. Try to replicate the pattern of dots shown below. Then try to daw nice even lines the same width as those dots. If you can do that, then you can do almost any type of camoflage or fade job with no problem. 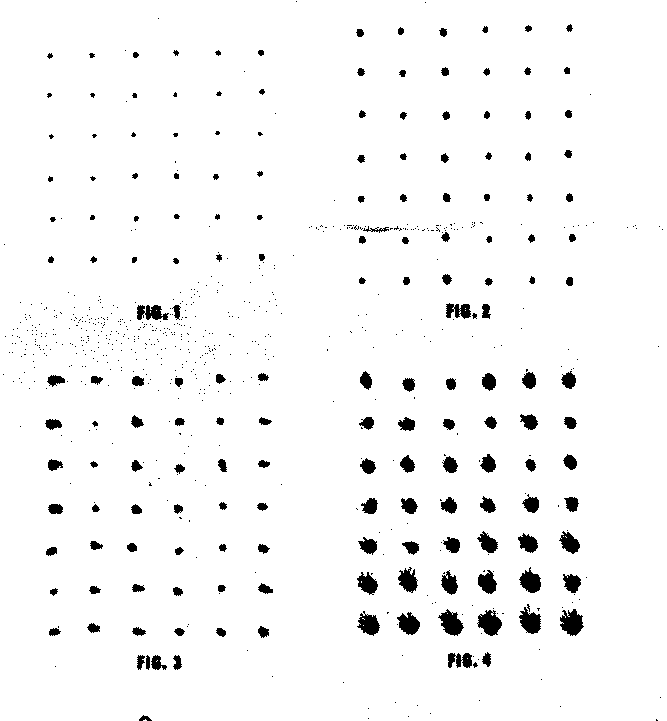 CLEANING: The key to good airbrush performance is keeping it clean. I clean my airbrushes with lacquer thinner. This stuff will dissolve all hobby paints with no problem and is safe on most high wuality airbrush parts. I buy it by the gallon or quart and use it instead of the thinner that i use to thin the paint which is more expensive. Lacquer thinner is relatively cheap in those quantities. I cannot speak for the Testor's Azteck series as they have a lot of plastic in them. The single action external mix types are very easy to keep clean. Normally I spray from lighter to darker colors in a sitting. For this I just squirt lacquer thinner throught the nozzle and feed tubes until it comes clear. I do not bother to disassemble the nozzle between coats unless the colors are close and there is the possibility of contamination. The same is true for the double actions, but they require more flushing of the solvent through the nozzle and I normally remove the needle and clean it even between colors. Once I am done for the day, I disassemble the airbrush per the manufacturers direction and thoroughly clean the parts with lacquer thinner. I soak the double action nozzles in a small bottle of lacquer thinner and squirt fresh solvent thru it with a pipette. I reassemble the airbrush and put it away. Sometimes the gaskets get a little hard so i put a little vaseline on them to soften them up. Most airbrush problems can be traced to either tooo thick or thin paint or a dirty or clogged nozzle, feedtube, etc. NEVER LEAVE YOUR AIRBRUSH DIRTY OVERNIGHT!! No matter how late it is always clean it. I have done this with my old reliable and it has given me over 35 years of trouble free service with only one rebuild of the gasket and air valve packing. Tank compressors require that yu occasionaly drain the water fromt the tank or it will rust from the inside out. If the compressor is kept on constantly with recharging of the tank pressure, I drain it once or twice a week. You will be amazed how quick those thing swill rust. I also drain the water trap when I see moisture in it. I hope this helps you in your airbrushing. See it ain't that hard is it? |